| ||
| Map Name | ||
|---|---|---|
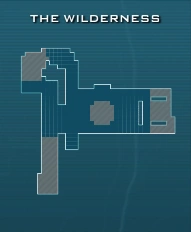
| The Wilderness | ||
| Region | Stage Number | |
| Swamp | << 4 - 3 >> | |
| Waves | ||
| 10 | ||
| Starting Resources | Resources per Wave | Total Resources |
| 300 | 300 | 3000 |
| Tower Bases in Field | Starting Tower Bases | Total Tower Bases |
| 0 | 10 | 56 |
Overview[ | ]
- The Wilderness is the 3rd map from Swamp
- There are time limits before waves 3, 6 & 9 - one minute each
- It starts with 300 Resources & 10 bases
- After each wave, 300 Resources are given
- The bases given are:
- after waves 1 & 2 - 8,
- after waves 3 to 5 - 6,
- after waves 6 to 8 - 4
- after wave 9 no new bases are given
- The map has 10 yellow plant mines (links in Youtube & Steam: [1], [2]). Each one of these deals the same damage as a rank 1 AR mine (7500), regardless of size.
Enemies[ | ]
- The spawn point that will spawn first is marked with an asterisk "*". If more than one spawns at the same time, both are marked.
Wave 1[ | ]
| Northwest | Southwest | *East* |
|---|---|---|
| - | - | 10 x Walker |
Wave 2[ | ]
| *Northwest* | *Southwest* | East |
|---|---|---|
| 6 x Bobble Head | 3 x Walker Warrior | - |
Wave 3 (1:00 Time Limit)[ | ]
| Northwest | Southwest | *East* |
|---|---|---|
| 12 x Walker | 8 x Walker | 25 x Runner |
| 12 x Walker Pup |
Wave 4[ | ]
| Northwest | Southwest | *East* |
|---|---|---|
| 6 x Walker | 5 x Walker | 12 x Screamer |
| 6 x Screamer | 5 x Screamer |
Wave 5[ | ]
| Northwest | Southwest | *East* |
|---|---|---|
| 10 x Walker | 1 x Armoured Heavy | 2 x Armoured Heavy |
| 3 x Spitfly |
Wave 6 (1:00 Time Limit)[ | ]
| Northwest | *Southwest* | East |
|---|---|---|
| 2 x Walker Warrior | 1 x Soaker | 2 x Soaker |
| 10 x Snorker | 3 x Hoverer |
Wave 7[ | ]
| Northwest | Southwest | *East* |
|---|---|---|
| 4 x Walker | 10 x Walker | 1 x Walker Patriarch |
| 25 x Walker Pup | ||
Wave 8[ | ]
| Northwest | Southwest | *East* |
|---|---|---|
| 9 x Walker | 8 x Screamer | 9 x Walker |
| 2 x Armoured Heavy | 6 x Screamer | |
| 3 x Walker Warrior | ||
| 15 x Walker Pup |
Wave 9 (1:00 Time Limit)[ | ]
| Northwest | Southwest | *East* |
|---|---|---|
| 2 x Hoverer | 4 x Hoverer | 6 x Hoverer |
| 6 x Rhino | 8 x Screamer | |
| 4 x Spitfly |
Wave 10[ | ]
| Northwest | Southwest | *East* |
|---|---|---|
| 10 x Spitfly | 10 x Spitfly | 10 x Bobble Head |
Notes & tactics[ | ]
- Skye & Sweet can do great job, even with 5 Feats of Strength. Skye can be effective with Drone Launcher on heavy enemies for the stacking damage in this and random other maps with such foes. The Drone Launcher can do some good job with some other characters as well, like Sweet & Tsygan. It shines mostly vs the armor-heavy enemies, although it can do some good job vs Soakers, Hoverers and other enemies.
- The Voltaic Hand Cannon can find good use with the DPS, the penetrating shots & the homing projectiles. A linear path can help to shoot multiple lumes with the penetrating Voltaic Hand Cannon, e.g. from the Focus Towers toward the Core.
- One or more Focus Towers can do good job, e.g. in the section near the Northwest.
- Violators can cover a wide area of the map.
- Anti-air towers can do good job in all waves with Spitflies, although their main purpose is for the last (10th) one. In the earlier waves with them (5 & 9) they can help the player to not get distracted and confused from flying enemies who 've happened to get close to the core, and the AA towers would find use in the 10th wave anyway.
- Perks
- Reinforcements can do some job to distract the aggressive lumes, such as Walkers, Screamers, etc (the perk spawns explorers, up to 5 per ground weapon kill).
- Bloodletter can help for Wave 3, where are a bunch of tiny enemies. ( +100% damage after killing 4 enemies, for 12 seconds.).
- Tactical Juxtaposition can make the Drone Launcher and many other weapons more effective, covering more enemies, hitting them faster.
- Generally talking, any other perk that improves weapon damage (Hollowpoint rounds, Fast hands, Marksman, etc) can come in handy.
- Core protection perks are usually not very needed, since the most problematic wave is 3, but it's likely to handle with zero or low amount of core health lost.
- It is good to build your maze to funnel the East spawn into the Southwest spawn, then into the Northwest spawn. However, there are multiple options where to build and all can have good results.
- In wave 7 (with the Boss):
- You might want to reinforce walls near the core (e.g. Criss-Cross Pattern, not build a solid chunk of walls).
- The boss Walker Patriarch will spawn first. He can be distracted with weapon damage and close distance and even trapped in AR mines and the yellow ones in the level. If there is more space and not many bases around, then there is also some more likelihood he to go after the closest player/players. (It is good if all players are close to each other to lure him effectively.
- The rest of the enemies in this wave are relatively easy to fight with the Voltaic Hand Cannon or any other weapon that has good damage, particularly those with AoE fire modes.
- In the last wave, the most useful tower is the Anti-Air, and it is a fine option to sell everything else in favor of the AA tower(s), and the Bobble Heads can be easilly dealt with, or without Drone towers or Rupture mines since weapons are more than enough in most scenarios. Even 1 AA tower (with or without overcharge) can do the job vs the Spitflies, although 2-3 of them feel a bit better. These towers should be put to the West side, closer to the two spawn points of the Spitflies.
- There are specific points & locations, where, if Slow fields or mines are drop, they can no longer be picked up again. These are mainly close to the East spawn point, where they can become both somewhat invisible and impossible to take (in lower grounds). So it is recommended that these are either temporarily staying on bases, or to be sure that they'll be not moved after putting them on the ground.
Video playthroughs with links, towers, modes & results[ | ]
- [link] - with 13 Violators & Anti-air; 5 Feats of Strength; undamaged core
- [link] - with 6 Cannons, 2x Anti-air & Kairos; 5 Feats of Strength; undamaged core
- [link] - with 6x Focus; 5 Feats of Strength; 3900 core health remaining
Vids before 28 Sep 2015 (for these it is wise to check update(patch) notes in [link1], [link2], [link3], etc):
[link] - with 5x Focus before wave 10 and 3x Focus in wave 10; 5 Feats of Strength; undamaged core