| ||
| Map Name | ||
|---|---|---|
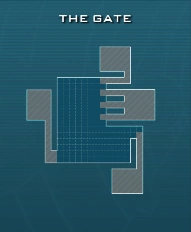
| The Gate | ||
| Region | Stage Number | |
| Facility | << 1 - 4 >> | |
| Waves | ||
| 8 | ||
| Starting Resources | Resources per Wave | Total Resources |
| 300 | 250 | 2050 |
| Tower Bases in Field | Starting Tower Bases | Total Tower Bases |
| 0 | 12 | 60 |
Wave 1
Total Inventory
- 300 Resources
- 12 Tower Bases
Enemies
- 8 Walkers (west)
Build Strategy
Start by covering all of the entrances up the ramp to the core, and then build outward. Additional spawns will be used, and you will want to force all enemies down a single path.
Combat Strategy
The 8 walkers will come out two at a time. Just simply pump your weapons into them. You will likely save a few of the conscripts.
Rewards
- 250 Resources
- 10 Tower Bases
Wave 2
Total Inventory
- 550 Resources
- 22 Tower Bases
Enemies
- 20 Walker Pups (south)
- 3 Screamers (west)
- 6 Walkers (west)
Build Strategy
Try to force the enemies down a single path. Continue building outward from the core. so they can all take punishment from the towers.
Combat Strategy
The Walker Pups do not spawn right away, and the conscripts can hold them off for a while, so begin at the west spawn point, and defeat a few screamers and walkers before returning to the maze to deal with walker pups, which will die quickly. Not too tough of wave.
Rewards
- 250 Resources
- 10 Tower Bases
Wave 3
Total Inventory
- 800 Resources
- 32 Tower Bases
Enemies
- 8 Walkers (north)
- 2 Walker Warriors (north)
Build Strategy
The last wave that only uses a single spawn point. Continue routing your maze away from the spawn, so the enemies will have to traverse the entire map. By now, if you have only been building towers, you should have between 4-6 towers. By this point, you will likely want to begin upgrading towers, because the enemies will swarm more in later waves, and rather than strength in pure number, you will likely want to get strength in individual towers, as opposed to simply spamming them.
Combat Strategy
The first Walker Warrior will spawn with 2 Regular Walkers right behind him. You will notice, there are a lot of explosives along this route. Simply shoot at them a few times to detonate them, since this is the only wave where you will be truly focused on this entrance, using them is not a bad idea. The explosions will deal bursts of damage, and stun the affected enemies for a few seconds. The Walkers will continue to come out in pairs, while a warrior walkers will accompany the 3rd pair. Continue pumping attacks into them while keeping a slight distance and you'll beat them back.
Rewards
- 250 Resources
- 7 Tower Bases
Wave 4
1:10 Build Phase
Total Inventory
- 1050 Resources
- 39 Tower Bases
Enemies
- 20 Runners (north)
- 15 Snorkers (north)
- 8 Walkers (south)
- 8 Screamers (west)
Build Strategy
Lots of swarm enemies, so, rapid fire towers (Gatling would be ideal for this point in the game) are the way to go generally. Upgrade those cheap Gatlings, and the snorkers and runners will fall quickly.
Combat Strategy
You as the player will want to focus on the walkers and screamers. When you see the snorkers, if they start screeching, move. They come in groups, and will down you in only 2 rapid hits (3 if you are Haigen) As usual, keep your distance, and work with your towers when you can.
Rewards
- 250 Resources
- 7 Tower Bases
Wave 5
Total Inventory
- 1300 Resources
- 46 Tower Bases
Enemies
- 50 Runners (north)
- 8 Screamers (north)
- 8 Walkers (south)
- 2 Armoured Heavies (west)
Build Strategy
We look at the West Spawn Point, and we see the newcomer, the Heavy. The Gatlings will realistically be unable to scratch the heavy, so if you have built a few lightning towers, they will be able to damage the heavy (not kill it, that's your job) So, continue upgradinging rapid fire towers because 50 runners is a lot.
Combat Strategy
Begin by camping the West Spawn Point where the Heavies come out. The first will Spawn before anything else. If you are simo, use your sniper rifle on it's weak spot. If you are Haigen, charge up your shotgun into its weakspot. If you are Sweet or Skye, use your secondary weapons because the Assault Rifle and Rex are typically not great weapons to fight Heavies with. Try to down the first Heavy before it gets too far into your maze. It will soak up tower hits that are meant for the runners. The second Heavy will spawn later, in which case you will want to fight everything else, leaving the heavy for last so you don't get beat up by the screamers and walkers while you focus.
Rewards
- 250 Resources
- 6 Tower Bases
Wave 6
Total Inventory
- 1550 Resources
- 52 Tower Bases
Enemies
- 2 Screamers (north
- 10 Walkers (north)
- 40 Runners (south)
- 2 Soakers (west)
- 12 Walkers (west)
Build Strategy
We see a soaker, and we know that they hate Gatling towers, but you have upgraded enough Gatling towers by now, that you should upgrade the other towers, or begin building new ones in the lacking areas of the maze.
Combat Strategy
Begin at the west spawn point again, and begin unloading damage on the soaker. You have a few seconds before the walkers behind the soaker start spawning. if you are using Skye, you might be able to down the soaker before the walkers reach you. Once the Walkers enter the mix, shift your attention to the walkers. If you can block the walkers, the towers will focus on the soaker and finish what you started. Focus on the enemies that are the furthest along. The second Soaker will spawn later. Ignore it until you destroy everything else. Then pump player damage into it and it will fall before long.
Rewards
- 250 Resources
- 4 Tower Bases
Wave 7
1:14 Build Phase
Total Inventory
- 1800 Resources
- 56 Tower Baases
Enemies
- 1 Soaker (north)
- 8 Walkers (north)
- 2 Armoured Heavies (south)
- 40 Walker Pups (south)
- 8 Walkers (west)
- 2 Walker Warriors (west)
Build Strategy
We see 1 Soaker and 2 heavies in the same wave. This is the toughest wave you have fought so far. Focus on Rapid Fire towers, to aid in the assault. The heavies and soaker will be your primary concern. The towers will likely be able to handle most of the remaining enemies, so continue improving on that, so you worry les about them, and more about the tanks.
Combat Strategy
Start at the North Spawn point where the soaker is. That spawns first, and you want to start hitting it as early as possible. Same as the previous wave, The walkers will spawn a few seconds after, and by that time, you might be able to finish off the only soaker. The heavies will be the next focus, they spawn very closely to one another, so divert your attention towards them when the actually enter the maze. Until then, fight the walkers and walker warriors that entered the maze, since they are the fastest enemies in the wave. Fight them back until the heavies catch up, odds are, they will all be finished by that point. Pummel the Heavies with power attacks, and move on to the final wave.
Rewards
- 250 Resources
- 4 Tower Bases
Wave 8
Total Inventory
- 2050 Resources
- 60 Tower Bases
Enemies
- 20 Runners (north)
- 5 Screamers (north)
- 6 Walkers (south)
- 1 Walker Warrior (south)
- 15 Snorkers (west)
- 1 Walker Patriarch (west)
Build Strategy
Use the last of your bases, and if you have nowhere to put them, put them as close to the western spawn point, and use them to slow the boss. There are 2 ways to fight this wave. Both consist of upgrading towers as opposed to building them, primarily, upgrade the towers closest to your core, and go to the western spawn point.
Combat Strategy
The Western Spawn point is the place to be. The wave will begin with snorkers coming out of the cave. Shortly after the 3rd miniwave, the Patriarch will make himself known. The first method to fight this wave, is to trust your towers to fight the rest of the wave, while you distract the patriarch, and possibly take a beating yourself. Or you can let the patriarch begin massacring your maze, while you fight the little guys, saving him for last.
Patriarch First - Run up to him, and get him to attack you. If he uses his echo slam (He rises both arms, and slams the ground) be prepared to jump. if he does his forcible bash, there is a good chance you will get hit, because his arms are huge and that attack is relatively quick if he is not slowed down. He has a lot of Hp, so the fight will be time consuming. Once he falls, return to your core, and work outwards to take on the stragglers.
Patriarch Last - Keep your distance, and fight the enemies are they will likely push you back for a bit. Pump weapons into them, and let weaker enemies by to be finished off by the towers. The wave isn't that large, since the main focus is the patriarch. It's self explanatory, but by the time you finish, the patriarch will have likely started bashing the maze. Lure him over to whatever you towers you might still have, and let them hit him before he bashes those. Lure him to tower bases as well, as he will attack those instead of you, so keep some slight distance. After a while, he will have his cool death animation, and you will clear the map.